DIY House Decor: Greetings Garland
Garlands have been gracing our homes and parties for quite some time now, and they bring festive flair to any setting or occasion. I thought it would be fun to add a new twist to these trendy creations by using them in place of greeting cards! The greetings garland I designed is just the right size to fit inside a decorated tea tin, but glassine envelopes, kraft sacks, or regular envelopes would work as well.
Beautiful patterned papers, stickers, and die cuts from the Gathering collection by Authentique were a perfect match for the sentiment “A happy family is tied together by love.” To make a similar greeting garland, simply use a variety of the papers to punch out the desired number of circles in the correct size for your container or envelope. Add the sentiments that are appropriate to the occasion. You will need to punch out a front and a back for each segment. Sandwich orange and sea foam May Arts baker’s twine between each circle and its coordinating backer circle. I used Scor-Tape to hold the twine in place and foam adhesive squares to glue the matching circles together.
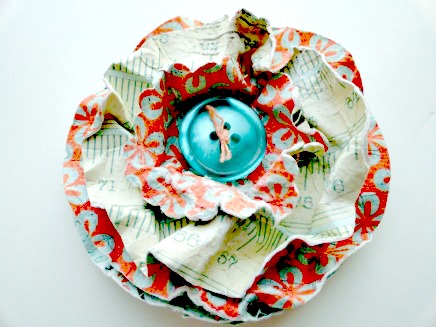
 The flower is made by punching out 4 large circles and 1 small circle from a variety of coordinating patterned papers. Spritz the circles with water and then gently crumple them to add texture. Stack the circles with the smallest on top and staple them together in the center.
 Embellish the flower with a button attached to the center with a foam adhesive square. I pulled a couple of orange threads from the baker’s twine and threaded them through the button holes for a decorative touch.
 Tie May Arts ribbons between the circles in a simple knot to finish the garland.
{I used turquoise is 5/8” sheer/ruffle edge and sheer/pull flower with orange threads}
 The fabulous new i-magicut ribbon cutter by Imaginisce works like a dream to cut and seal the ends of the ribbons! If you haven’t tried this tool yet, you will love it! It’s easy to use and prevents the ribbon ends from fraying, A real bonus with sheer ribbon!
 Fold up the greetings garland and put it in the tea tin or envelope with the flower on top. Decorate the tin with patterned paper and tie it up with a pretty ribbon bow. Now you have a fun alternative to the traditional card! Use them for graduation, baby showers, bridal showers, or for party favors…the possibilities are endless!
For a link to a download of this tutorial please visit Serendipity Vintage Studio. Happy crafting to all from Kimberly!
Blog post by: Kimberly Jones


